qupaya meets Gatsby!

A Blog created with Gatsby and Markdown

Hello from our new blog! The header image shows a nice view of Nuremberg, doesn’t it? It’s that beautiful city where qupaya’s headquarters are located. Unfortunately, we currently cannot enjoy this view as much as we would like, because we may not go outside.

Why that? Because we happened to found our company exactly at the beginning of the global Coronavirus pandemic. So, what to do with all the spare time we are forced to spend indoor? Why not start a blog? Let’s set this up…

tl;dr

We created our Blog with Gatsby and default Markdown.

Gatsby Setup

Our website is implemented using Gatsby, a static site generator based on React. There are many plug-ins provided for Gatsby. Since blogs are a very common use case, its official documentation provides a step-by-step guide to configure one. It leverages Markdown for blog posts, which we wanted to do anyway, so it was a perfect fit.

For new projects, there is also a Gatsby starter template for a blog. Our code base already existed, so that was not an option (it could still be useful as a reference project, though).

Markdown vs MDX

There is Markdown (you probably know this one from the generated README file you forgot to update) and there is MDX. With MDX, it’s possible to include components written in JSX (React’s syntactical sugar to blend HTML with JavaScript) in your Markdown.

It looks like this:

import { FancyThing } from '../components/fancy-thing'

# Here’s a fancy thing

The fancy thing is rendered inside our MDX document:

<FancyThing />

This is a powerful enhancement of standard Markdown, but in my opinion, it also has a big drawback: It’s not standard Markdown.

When we decided to use Markdown for blog posts, we didn’t do that only because Markdown is a nice, light-weight mark-up language, but also because it is widely supported by all kinds of tools and environments. What if someday we decide to move our blog to another framework that doesn’t support MDX? What if we want to replicate blog posts on other platforms like Medium or Dev.to? Maybe we want to write our blog posts directly in GitHub or GitLab without the need to compile the whole page.

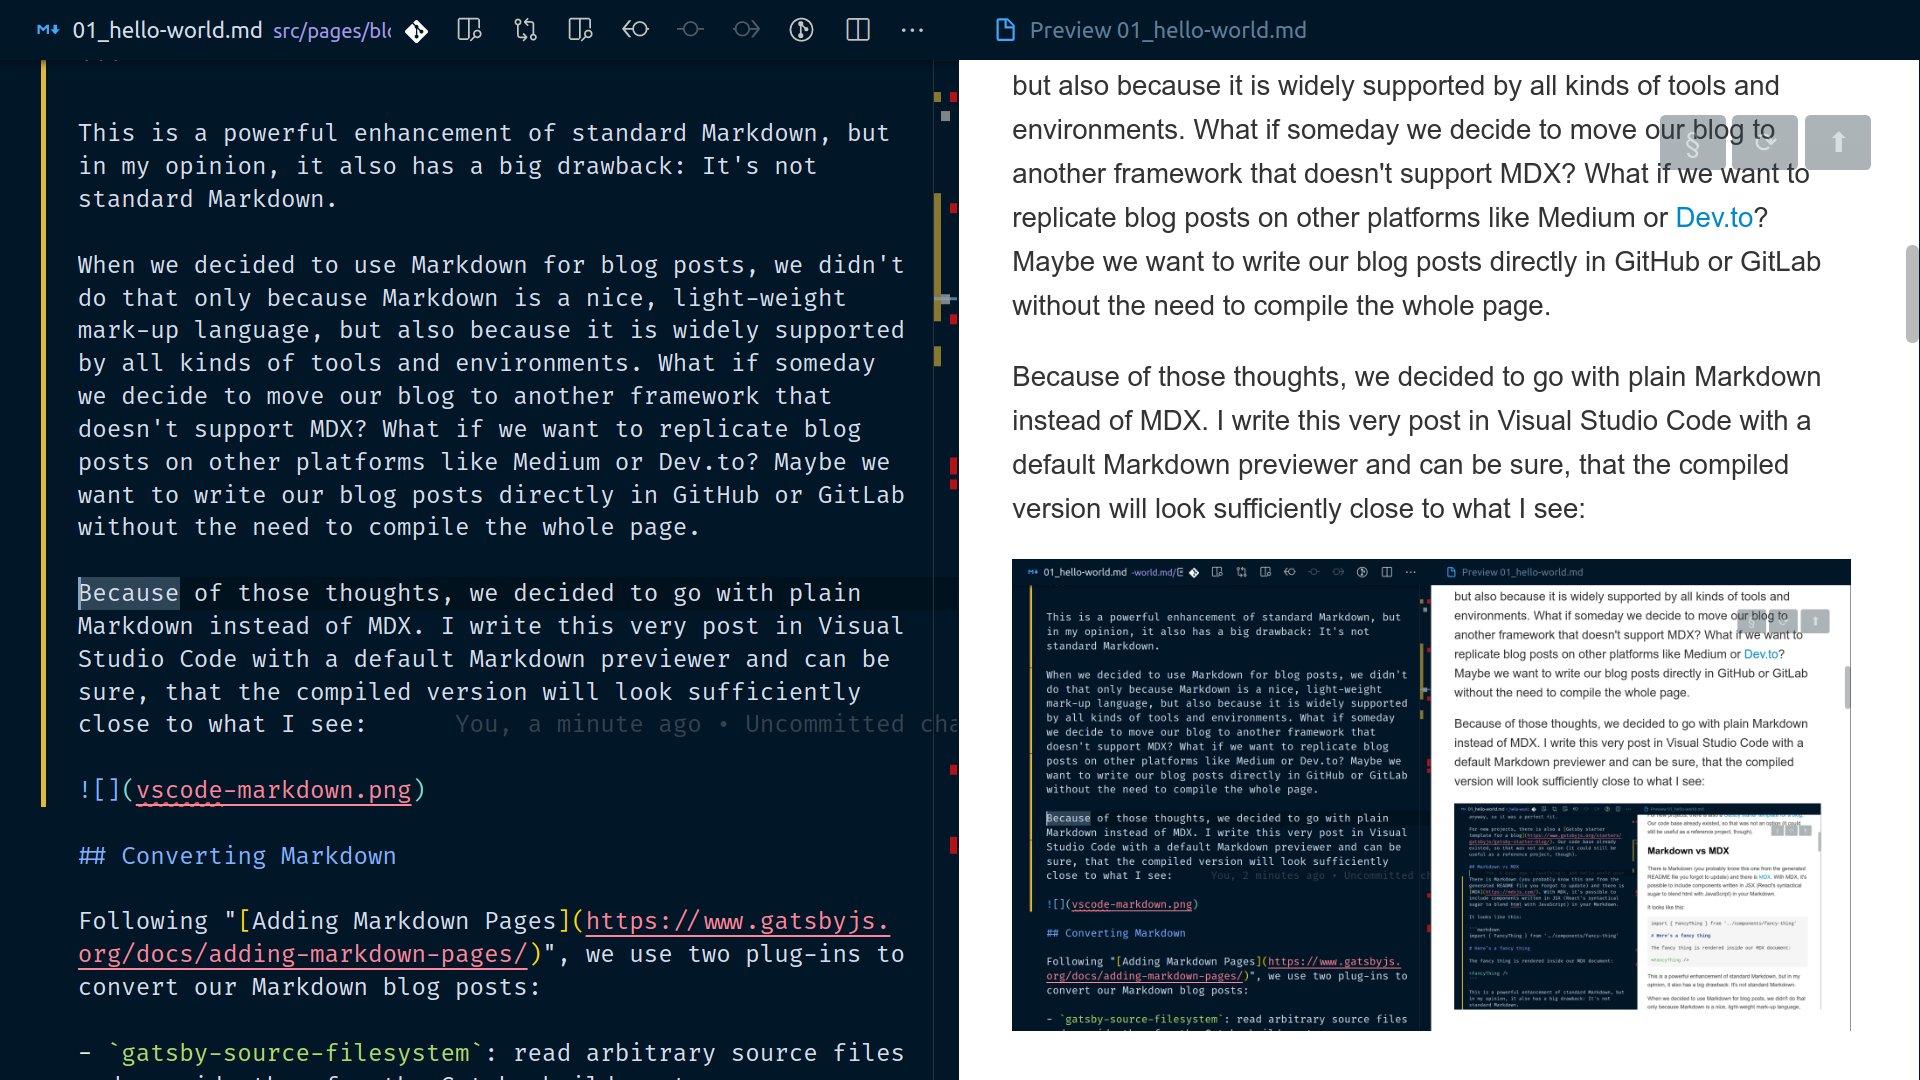
Because of those thoughts, we decided to go with plain Markdown instead of MDX. I write this very post in Visual Studio Code with a default Markdown previewer and can be sure, that the compiled version will look sufficiently close to what I see:

Writing blog posts in Visual Studio Code

Converting Markdown

Following “Adding Markdown Pages“, we use two plug-ins to convert our Markdown blog posts:

  • gatsby-source-filesystem: read arbitrary source files and provide them for the Gatsby build system
  • gatsby-transformer-remark: transform Markdown to HTML and provide metadata like author and title

The later reads metadata from key-value pairs provided in the header of each Markdown blog post. The following is an excerpt from this post’s header:

1  ---
2  path: '/blog/hello-world'
3  date: '2020-03-26'
4  title: 'Hello World!'
5  ---

Using gatsby-transformer-remark, those key-value pairs are provided as frontmatter via Gatsbys GraphQL engine, so we can access them from within a template component for blog posts:

const { markdownRemark } = props.data;
const { frontmatter } = markdownRemark;

return (
  <div className="blog-post">
    <h1>{frontmatter.title}</h1>
    <div>{frontmatter.date}</div>
    // ...
  </div>
);

The path property defines the URL under which the blog post can be accessed on the website. Gatsby’s createPages API is used to actually create those pages using the blog post template component mentioned above.

????️ Note: We use TypeScript, because we’re convinced that it leads to better maintainable projects and better development experience. Although Gatsby’s guide is for JavaScript, we had no problems transferring the code. When declaring the template source file for blog posts, you can simply provide the TypeScript file:

const template = 
  // ORIGINAL: src/templates/blog-post.js`
  path.resolve(`src/templates/blog-post.tsx`);

Reference Blog Posts from other Pages

Adding a List of Markdown Blog Posts provides details on how to access all posts to create an overview page. The following GraphQL query can be used to retrieve all posts, sorted by date:

querry {
  allMarkdownRemark(sort: {
    order: DESC, fields: [frontmatter___date]
  }) {
    edges {
      node {
        id
        frontmatter {
          date(formatString: "MMMM DD, YYYY")
          path
          title
        }
      }
    }
  }
}

An html link can be created in any component by using node.frontmatter.path as target URL:

const posts = allMarkdownRemark.edges.map(edge => (
  <Link to={edge.node.frontmatter.path}>
    {edge.node.frontmatter.title}
    ({edge.node.frontmatter.date})
  </Link>
));

Images

A blog without images would be a very dreary thing. I mean, look at this and tell me to my face that you don’t feel better immediately:

A Kitten (Photo by Tran Mau Tri Tam on Unsplash)

Gatsby has you covered in their article about Working with Images in Markdown Posts and Pages. It shows how to set up Gatsby for images stored either in the same or in different folders. We decided to go with the first option so that we have both Markdown and images in one location:

Folder structure with blog posts and images in the same location

There are two types of images we integrated with our blog, following that guide: featured images and inline images.

Inline images

Since we want standard Markdown, gatsby-transformer-remark is used in conjunction with gatsby-remark-images to process images. It’s a plug-in for the plug-in ????‍♂️️:

{
  resolve: `gatsby-transformer-remark`,
  options: {
    plugins: [
      {
        resolve: `gatsby-remark-images`,
        options: {
          maxWidth: 800,
          showCaptions: true
        },
      },
    ],
  }
}

We use the showCaptions option, to automatically convert the Markdown image title to a visual caption (you can have a look at all available other gatsby-remark-images options in the documention). The kitten image above was created using Markdown syntax we’re used to:

![A Kitten](./tran-mau-tri-tam--81lVsfM4gQ-unsplash.jpg)`

The rendered HTML looks like this:

<figure class="gatsby-resp-image-figure" style="">
  <span class="gatsby-resp-image-wrapper"> ... </span>
  <figcaption class="gatsby-resp-image-figcaption">A Kitten</figcaption>
</figure>

Gratefully, gatsby-remark-images produces clean, semantic HTML for us, using figure and figcaption! There does not seem to be a way to inject custom CSS classes into the generated code, though. If we want to change some visuals, e.g. center the image caption, we have to select tags or the existing classes in our CSS style definitions:

figcaption /* or .gatsby-resp-image-figcaption */ {
  text-align: center;
  color: gray;
  font-size: small;
}

????️ Note: gatsby-remark-images only processes standard image formats like png, jpg, etc. Others like SVGs or GIFs get ignored, which means, that the also arent automatically published as assets. To use those image formats, add gatsby-remark-copy-linked-files as a plug-in to gatsby-transformer-remark. In this way you don’t have to do without your loved animated memes.

Note, however, that you have to do the styling and caption stuff manually in this case. It can be done by utilizing HTML in Markdown, e.g.:

Not a Kitten (GIF By Modicum on Giphy)
<figure style="text-align: center">
  <span>
    <img
      src="./dog-modicum.gif"
      alt="Animated dog typing on notebook"
      style="max-width: 100%"
    />
  </span>
  <figcaption>Not a Kitten (GIF By Modicum on Giphy)</figcaption>
</figure>

Featured Images

The featured image is the eye-catcher image on the very top of each blog post. It often is also shown as a thumbnail picture in previews. That’s why it’s not part of the Markdown content itself, but is a property of the front-matter.

Again, a detailed tutorial of how to add a featured image to front-matter can be found in the Working with Images in Markdown Posts and Pages tutorial.

In short: by adding a featuredImage field to the pageQuery in blog-post-template, we can access it later in our component:

# pageQuery
frontmatter {
  # ...
  featuredImage {
    childImageSharp {
      fluid(maxWidth: 2048) {
        ...GatsbyImageSharpFluid
      }
    }
  }
}
// inside BlogPostTemplate component
const featuredImgFluid =
  frontmatter.featuredImage.childImageSharp.fluid;

<Img
  fluid={featuredImgFluid}
  alt="featured image"
  objectFit="cover"
  style={{ height: '45vw' }}
/>;

Notice, that we decided to allow a maximum width of 2048 pixels for the image ????️. This could be quite big for mobile devices. However, gatsby-plugin-sharp is used to pre-process images before they are sent to the client, so the actual file size should correlate to the responsive image size!

We can verify that using the development tools in a browser of your choice, e.g. Chrome:

Analyzing featured image file size in Chrome's development tools
  1. Open development tools with F12
  2. Select Network tab
  3. Activate Disable cache, because we want to see the real numbers
  4. Press F5 to refresh browser page
  5. Look at the Size column of the image you want to analyze

In the screenshot above, the size of this post’s featured image, thomas-winkler-VkyUNml-xfA-unsplash.jpg, is 168 kilobytes. Window width was about 1800 pixels, desktop size, so that number is ok. Some quick additional checks for page sizes of 500 and 1000 pixels yield 16.2 and 51.3 kilobytes, respectively. We can live with that! If you’re not satisfied, there are some additional fine-tuning possibilities you can look up in the gatsby-plugin-sharp documentation for fluid mode.

Syntax Highlighting

Last, but not least, for a technical blog that is focused on development topics, syntax highlighting is very important, of course. The two most common players in Gatsby seem to be gatsby-remark-prismjs and gatsby-remark-vscode (at least that’s my impression after researching for about 2 minutes ;-)).

Both look good, but gatsby-remark-vscode had me with this:

“JavaScript syntax highlighting libraries that were designed to run in the browser, like Prism, have to make compromises (…). Your Gatsby app, on the other hand, renders to HTML at build-time in Node, so these constraints don’t apply.”

That’s totally true! Finally, we can use a sledgehammer for cracking a nut (hopefully this is the right translation for German “mit Kanonen auf Spatzen schießen”) without having a bad conscience (maybe future me will hate me because of long build times, though). Once added to gatsby-config.js, default Markdown code blocks are transformed to beautiful HTML:

1  ```typescript
2    //some TypeScript code
3  ```

The beauty of it can be witnessed in the various examples of code highlighting in the sections above. It’s even possible to highlight lines in the code block:

```typescript{1,3-5}
const ContactPage = () => (
  <Layout>
    <SEO title="Contact" />
    <h1>Contact</h1>
    <p>Don't call us, we call you.</p>
    <Link to="/">Go back to the homepage</Link>
  </Layout>
);
```
const ContactPage = () => (
  <Layout>
    <SEO title="Contact" />
    <h1>Contact</h1>
    <p>Don't call us, we call you.</p>
    <Link to="/">Go back to the homepage</Link>
  </Layout>
);

Note, that for this to actually show something, some CSS styles must be provided:

.grvsc-container .grvsc-line-highlighted {
  background-color: rgba(255, 255, 255, 0.2);
  box-shadow: inset 2px 0 0 0 rgba(255, 255, 255, 0.5);
}

Syntax highlighting is supported for many languages by default. Unfortunately, GraphQL is not one of them. It was not straight forward to add GraphQL grammar support (i.e. I gave up after unsuccessfully trying to install the Visual Studio Code GraphQL extension as npm package like suggested in the documentation). So for starters I ended up pretending it’s Python code because it looked ok-ish. I added a ‘graphql’ alias that points to the Python language, so that I will not have to change posts later when I manage to set up an extension. This can be done in the plug-in options:

{
  resolve: `gatsby-remark-vscode`,
  options: {
    //...
    languageAliases: {
      // Map of custom/unknown language codes
      // to standard/known language codes
      graphql: 'py',
    },
  }
}

Outlook

The setup we start with is quite basic, but should be enough for most articles. Things that we might or might not add in the future include:

  • A comment section (we fear the moderation efforts, though)
  • Article categories using tags to improve the overview page
  • Possibility to link blog posts to build article series
  • Correct GraphQL highlighting

Thanks for reading!